Here’s the updated and detailed (with pictures) Lost Lands 11 Chapter 1 Walkthrough (Anomalous Event). I have covered all the puzzles and pieces to help you complete the first chapter.
![Lost Lands 11 Chapter 1 Walkthrough [With Pictures]](https://www.mrguider.org/wp-content/uploads/2026/02/Lost-Lands-11-Chapter-1-Walkthrough-With-Pictures.webp "Lost Lands 11 Chapter 1 Walkthrough [With Pictures]")
Lost Lands 11 Chapter 1: Anomalous Event Walkthrough
About Chapter 1: During the construction of the tower, an important magical artifact is stolen. A young sorceress named Cassandra sets out to discover who took the artifact and why. Below is the complete walkthrough of the Lost Lands 11 Chapter 1.
Scene 1: The Stronghold Tower Under Construction
 Morphing Object, Manuscript, Hand Print")
- Pick the Candles, Lighten the Room, Notes, and The Box
You will find the candles in the lower corner of the wooden and mechanical structure on the left side. Tap it to save it in the inventory. The candle will then be placed on the toolbar at the bottom. Once done, tap the candlestick on the right side [bench]. Then select the candle from the bottom toolbar and replace the melted ones on the candlestick. Use the pipe near the candlestick to light the candles. To do that, first tap the candle, then the pipe. On the same panel, tap the paper notes (there are two: one is the fragment and the other is the portal well guide). After this, tap on the box behind the candlestick and open it.


Solve the Puzzle: After you open the box, the next step is to solve the design puzzle. Tap the exterior to reveal the puzzle. All you have to do is arrange the pattern as shown in the given hint. You can arrange them by tapping on the petals. There is a smaller one in each circle pattern. And there is a big one with five leaves. Rotate them wisely to match the pattern in the hints (see below). Once the pattern is arranged, collect the feather, snowflake, and powder from the box.


Talk to Dudi: After solving the box puzzle and collecting the feather, powder, and snowflake, you will find a man on the right side of the scene. His name is Dudi. Talk to him and get to the first floor.

After interacting with Dudi, tap on the barrel on the left side and collect the following: saw and crowbar. It also contains a manuscript.

Now, back to the main scene. Tap in the barrel on the right side. Use the crowbar to open the crates. Collect the metal bunch and handle from the crates.

Now, tap the lower mechanical part of the wooden structure located on the left side. Use the crowbar key to make it function.

After this, tap the upper mechanical part[above the structure]. Use the handle to lower the platform.

Once it has been lowered, pick the candle from the candlestick. Tap the platform and use the candle. Tap the platform again to lower it. Once you land at the bottom, collect the paper fragment.


Next, you have to restore the well walls. It’s another puzzle. Use the blue arrows to look around and the green arrows to see the list of rocks that you have to place. Tap the left blue arrow until you see the big gap area with a paper fragment; collect it. Then use the rock pieces to fill this section (use the green arrows on the left to see the rock pieces; this part fits two pieces).

Next, use the blue UP arrow on the right and move up a bit. Look around, and you will find another big hole with a shield in the corner. Fill it with two correct pieces.

Move up to the top and look around for another hole. This one also contains a fragment. This one needs three remaining pieces.

Now the wall is back to normal. Select the very first paper fragment that we got from the candlestick table. Put all the other fragments that we found in the well. Arrange them to complete the drawing. Tap to open the paper fragments. Then start arranging by rotating and placing them.

Use the platform and go back to the bottom of the well. Use the drawing that we just got. Then use the candle to burn it.

Head up. Select the well. Put the feather and powder into the well to activate the portal. A cutscene will begin, and then you will head to the top of the tower.
Scene 2: The Foreman
Begin by talking to Dudi. Tap on the boot after Dudi is gone. And collect the coins underneath these boots.


Pay attention to the chain area. Tap there. Use the saw to cut the wooden piece, then tap the chain again to pull it to the surface.

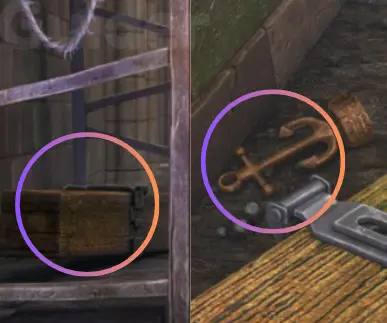
Now, to the left of this wooden structure. Tap the candelabrum and then use the coins to detach it from the wooden beam. Also, tap the anchor behind the wooden beam; you will need it in the next scene.

Next, go back to the chain side. Use the coins again to unscrew the wooden beam lock. Attach the candelabrum we just got. Tap it and then use the coins again to fix it up. Once everything is set, tap it to send it to the hole, then pull the ladder up. Tap the ladder to go to the next scene, which is the Chamber of Balance.

Scene 3: Chamber of Balance

In front, you have four round tables. Go through each one and collect the objects: fire from the left corner, a feather from the right corner table, Sun from the left table, and Moon from the right table. Next, select the ladder and place it below the top-right window. Collect the lockpicks. Place the ladder back and move to the top again.

Once you are at the top again, select the chest on the right and use the lockpicks on it. Collect the Metal Bunch from this chest.

Now, go through the vine gate on the left.

It’s another puzzle. Use the two metal bunches to get started. To solve it, you have to move the left-side warrior (the one with the red flag) to the right end (the green side). Tap it and follow the instructions below:
- right – right up – right down – left up – left down – left down – right – right down – right up – right up – right down – right – left up – right up – right down – right up – right down – right down – right up

Scene 4: The Terrace

Begin by removing the rubble that you see near the window and get the sword.

Tap the location icon in the lower-left corner and choose the Chamber of Balance Location scene. Once you are there, tap the door on the left and place all the statues.

- Top: Anchor and Feather
- Left: Sun and Moon
- Bottom: Shield and Sword
- Right: Fire and Snowflake
Once done, tap on the book in the center of the scene and collect the manuscript. A book with Pillar of Balance will appear; note down the colors and shapes [these might be different for you]:
 For me, it was:
- Red Arrow: Triangle
- Blue Arrow – Circle
- Green Arrow – Star
- Yellow Arrow – Small Triangle
Go back to the door where we just placed the statues. Tap the center with arrows. Point the direction towards the symbol that you got from the Pillar of Balance Book. This will open the door.
![]()
Go through the door, and you will enter a room where you have to find all the Weights of the Creation. There are 15 in total, including the hidden ones. To match the pattern, you have to find the corresponding object. I have shared the screenshot below. The one with arrows requires you to use the objects to fill the pattern and then get your hands on the weights. Check behind the circled objects for all the weights. There is one behind the wall that requires you to solve the puzzle. I have shared the puzzle solution image below.


After collecting all, you will get a cart of weights. Select it from the toolbar at the bottom, then tap the Pillar of Balance in the center of the Chamber of Balance scene. Now, you will have to solve another puzzle with weights. Use the weights to balance all the pillars. In my play, I had to scale each pillar to 22 counts. The task is to use all the weights, and each scale should have the exact count as its opposite.

Go to The Foreman scene (second scene, the top place where we had to go through the vines) and check out the glowing portal on the right.

Scene 5: Another World

Begin by talking to the beggar woman sitting there. Next, tap on the area where you see the footprints and collect the key.
 Use the key to open the door on the left side.

Go through the door to enter the room and get the key stuck on the wooden structure.

Next, tap on the fence in the front and use the knife to get past it.

Scene 5: Deserted Market

Begin by entering the tavern/house on the left. Talk to the tavern owner (Takayuki), and he will ask for the lotus flower. Tap the round arrow icon in the lower right to go back to the market scene. Tap on the left-side building (far behind) to enter the pond area.

Once you are there, tap on the lotus flower in the center.

Collect the lotus from the right-side pond as shown in the picture above. Go back to the tavern in the market area and give the lotus to Takayuki (tavern owner); first head to the tavern, select the lotus flower, and then select Takayuki. You will get the soup recipe from this task. While you are in there, tap the cauldron on the right.

Next, take the scoop from the barrel on the left.

Go back to the market scene. Tap the abandoned cart on the left -> tap again -> check all the vegetables -> collect the carrot (from the tray on the right). Get the potato from the basket that has cabbages [the potato is underneath the cabbages]

Now, tap on the red gate in the front and check the notice on the left. You need to do this to get the hint and enable the next puzzle.

Pay attention to the symbol and color of the stamp on the urgent notice. For me, it was a blue stamp with a bird symbol.

Next, check the cart on the right. Tap the rotten fish and collect the maggots on the leaf.

Uncover the chest underneath the tarp [see pic above; circle on the right]. Now, you have to solve a puzzle. For me, I had to place the bird on the blue spot and the fish on the yellow spot. You need to check the urgent notice on the red gate pillar to get the clue for this puzzle. It could be different for you. Once you are done solving this puzzle, another one will unlock. To solve this one, you have to place one chip on each aquatic creature’s claw.
- Begin with the bottom-right red claw
- Top-left blue claw
- Lower-right blue claw
- Top-left yellow claw
- Right-center yellow claw
- Left-center small blue claw
- Right-center small blue claw
- Lower-left red claw
- Top-right red claw
- Bottom-left yellow claw
- Top-center yellow claw
- Bottom-right blue claw [release]
- Bottom-right blue claw [again, place]
- Top-right red claw [release]
- Top-right red claw [again, place]
- Top-left red claw

Check the chest after solving the above puzzle and collect the following:
- Bobber
- Hook
Next, go to the pond area. Select the cauldron and fill it up with the drinking water [left side of the pond, fountain].

Now, tap the garden side on the right. Select a knife. Cut down the bamboo. Also, collect the 3 shiitake mushrooms. One is in the front and the other two on the sides.

Next, check the pond on the right and get 1 kelp.

Head to the Another World scene where the old beggar lady was sitting (the area where we cut the fence and entered the market). On the right side, collect the green onions.

In the same area, go to the barn on the left and tap on the thread box. Collect the thread.

Select the scoop from the toolbar at the bottom and pick some rice from the pot.

Next, head to the Chicken Coop. Select the scoop with rice and give the rice to the chickens. While they are eating the rice, collect the egg from the shelter.

Go back to the market, then the pond, and use the bamboo, thread, hook, bobber, and maggots to make a fishing rod. Once you have a fishing rod, catch the fish from the pond.

Now, select the recipe from the toolbar/inventory at the bottom and put in all the ingredients:
- Drinking Water
- Green Onion
- Rice
- Fish
- Kelp
- Egg
- Carrot
- Potato
- Shiitake Mushrooms

Next, go to the market and enter the tavern. Put the ingredients on the counter. Tap the preparation area/counter and follow the instructions:
- Select the kelp and then wrap the fish. Collect the wrapped fish.
- Put the green onions, carrot, shiitake mushrooms, and potato—chop them all. Collect the chopped vegetables.
- Now go back to the tavern view. Tap on the barrel on the left. Open the barrel and collect the ladle. In between these barrels, there is a key on the floor. Collect it as well. Tap the scoop on the barrel [it has rice].
- Tap the locked kitchen cabinet. Use the key to open it. Collect the spices and soy sauce.
- Now, on the right side, tap the Cauldron. Open the two pots. Then use the cauldron and pour water into both pots.
- Take the skewer near the egg.
- Put the egg on the right-side pot (the smaller one).
- Put the chopped vegetables + scoop/rice + soy sauce + spices in the big pot
- Above the kitchen cabinet, tap the coals. Use the fish and skewer. Place them in the coal heat.
- Collect the hand fan from the front window [top]
- Use the hand fan to raise the heat [where you just placed the fish]. Collect the grilled fish.
- Head to the cauldron area [where we put the eggs and ingredients in the two pots] and place the grilled fish.
- Use the knife to cut the fish and put it in the bowl.
- Use the ladle to pick the egg from the smaller pot. Tap the egg to remove its shell. Use the knife to cut it into two pieces.
- Collect the soup.

Go to the Another World Scene where we collected the green onions [the area with the old lady, chicken coop, and barn]. Tap the round icon in the lower-right corner to go back to the previous location. Select the soup and give it to the old olady.
Go to the deserted market area and take the left to enter the pond site. Take the manuscript, and in the center and behind it, you will find some coins. Select the coins from your inventory and then put one in the coin bowl. Next to the apples, collect the gong.


Go back to the deserted market. Tap on the red gate. Select the gong from the bottom inventory/toolbar. Place the gong in the gong plate top-left.

Tap the gong mallet to ring the bell. You will be taken to prison post this part [a cutscene will begin]. Next, you have to escape the prison.
Scene: Prison
Begin by tapping the guard in the front. Now, you have to solve the puzzle: recreate the pattern by connecting all the dots with rays. You can only draw a ray along each line once. I have marked each point and shared the instructions below to help you solve this puzzle.

- A to B
- B to G
- G to D
- D to B
- B to H
- H to C
- C to F
- F to E
- E to D
- D to F
- F to H
- H to A
- A to I
- I to E

Now, select the lockpicks from the inventory/toolbar at the bottom and use them on the prison door. Next, solve the puzzle to unlock the cell door. Click on the mechanism in the center from both sides. To complete this, rotate the rings with lockpicks to reach the mechanism. For this, please watch the video below.
You can get the footprint and the morphing object once you solve the puzzle.

Tap the guard on the floor. Take Keyring and the sword (wakizashi). Tap the door on the left (where light is coming), and you will find the guards playing the board game. Tap the door side to lock them.

Once they are locked, tap the door in the front. Look through it, and you will find a guard. Tap the right door twice. You will find that magic is not working anymore. Tap the red gem on the dummy.

Go back. Tap the upper-left area above the staircase. You will enter a new room (armory).

Scene: Armory

Begin by checking the papers on the table and take a look at the cryptex. Next, take the ladder. Go back to the cellars. Tap the pit door with blood around it. Use the key to open the pit door. Tap the pit door again. Use the ladder to reach the wounded man. Collect the green gem. You will also find the note behind the ladder at the bottom; collect it.

Now, go to the left pit door (the one with a shoe). Use the ladder to get down there. Tap the shoe to move it and collect the blue gem.

Go back to the armory room. Tap the table, then the cryptex. Select the note from the toolbar/inventory and put it near the cryptex. Tap the cryptex again to begin the puzzle.

Tap on each slot until you get the following:
- Warrior Mask
- Hand
- Bow
- Hare/Bunny/Rabbit

Open the cryptex to get the key and sake. While in the armory room, tap the door on the right and use the key we just got from the cryptex. Look outside, and you will find the barrel on the left with a yellow gem. Pick it. Go back to the armory room view and tap the spear on the left.

Go to the outside (where the barrel is). Select the spear from the inventory/toolbar at the bottom. Tap the lantern rope. You will have to maintain the balance to the end. Once you reach the other side, tap the rope ladder to throw it down and escape the prison building. Next, go to the pond side -> temple (where we got the gong). Tap the coin bowl and put the remaining coin into it. Then, take the key details box in the front.

Go back to the market. Take the ladder and head to the armory again.

While in the armory, tap the big chest. Then put all the gems in the four slots: yellow, blue, green, and red. Open the key details box. Tap the key ring. Then, tap the T-shaped metal keys inside the key details box. Use all four. Then use the flower metal key -> H-shaped metal key -> the remaining two = you will get one assembled key.

Go back to the cellar and tap on the left door. Use the assembled key to open this door.

Scene: Torture Room

Begin by tapping the trapped person in the front. Use the sword to cut down the rope and free them. Tap again and talk to the worker. Next, you will get a blueprint of Blue Festival Flame with some instructions. Take the firework blueprint. In the same room, on the right, tap on the small pit where smoke is coming out. Take the coal and fireplace POKER. Go to the armory room where we found the cryptex. Tap the table and take the cryptex tube.

Tap the big chest in the armory room where you put the gems. Use the poker to open the chest.

Next, you have to solve the puzzle. The clue is in the firework blueprint’s top-right corner. Tap and swipe to move the gems until you get the star and triangle at the top and the square and the circle at the bottom.

Once you solve the puzzle, the chest will open. Take the sulfur from the mini-box inside the chest. Remove the piece of cloth near the bottles, and you will find saltpeter underneath it. Also, inspect all the bottles. Go to the torture room. At the table in the front. Put in the coal, sulfur, and saltpeter. Tap the mortar tool on the left side of the table and then use it (with a tap).

To make gunpowder, you need
- Saltpeter (5 Parts)
- Tap KNO₃ (saltpeter) -> put in glass 4 -> from glass 4, put in glass no. 7 -> again, tap KNO₃ and put in 4 -> then from 4, put in 7. You have 1 left; now put the 7 back in the KNO₃, pour the 1 part in the 7 from glass no. 4, and fill the 4 from the KNO₃. Now put the 4 into the 7 to get 5 and pour it into the bottle on the left.
- Charcoal (3 Parts)
- Tap the charcoal bowl -> put charcoal in the container no. 7, then pour from this container to container 4 to get 3 parts. Pour the container no. 7 into the bottle on the left. Put the container with the no. 4 ingredient back in the coal bowl.
- Sulfur (2 Parts)
- Tap the jar with the S label and follow the instructions:
- Pour sulfur in the 7 qt. container
- Now, pour from the 7 qt. container to the 4 qt. container
- Empty the 4 qt. container back to the S Jar
- Pour the remaining from the 7 qt. container to the 4 qt. container
- At this stage, 7 is empty, and 4 has three parts
- Fill the 7 qt. container from the S Jar
- Pour from 7 qt. container to 4 qt. container
- Now, the 4 qt. container is full
- 7 qt. container has six parts
- Empty the 4 qt. container into the S Jar
- Pour from 7 qt. container to 4 qt. container
- Now, the 4 qt. container is full
- 7 qt. container has two parts
- Pour the remaining 7 qt. container into the bottle on the left
- Tap the jar with the S label and follow the instructions:
- Tap the cork on the left to finish the process of making the gunpowder.

Now, go to the armory room, head outside, and leave the building using the lantern rope and then the ladder on the watchtower. Once you are out, go to the pond side and enter the temple building. Tap the bowl with coins and try to take the coin (you won’t be able to because you have to give something back). Head back to the deserted market, tap the red gate, and take the gong back. You won’t be able to get the gong if you didn’t visit the temple and attempt to take the coin. So do that first and then take the gong back.

Now go back to the temple again. Put the gong on the offering side (near the apples), tap the bowl with coins, and take the copper coin.

Once you have the copper coin, go to the armory room (market area -> watchtower rope -> armory -> tap the round/back arrow icon in the lower-left). Tap the grinder on the left -> tap again to start using it -> select the copper coin and put it in the smashing spot -> tap the handle. Grind the copper coin to get copper shavings; use the white cloth and brush near the grinder to collect it.

Select the fireworks blueprint from the toolbar/inventory at the bottom and put in all the items: cryptex body/rocket body/tube (same thing), gunpowder, thread/rope, and copper shavings.

- Add the gunpowder/bottle to the cryptex tube
- Add Copper Shavings
- Pour sake over the thread
- Tap the thread and then the cryptex tube to complete the firework-making process.

Leave the building (armory -> lantern rope -> watchtower rope -> market area). From here, go to the pond side. Outside the temple building, tap the lamp. Place the firework on the wooden holder. Tap the lamp and take the burner inside it.

Go to the market area and light the rope using the burner and start the fire.

Once the fireworks start, a cutscene will begin, and you will end up outside the another world scene with two people sitting in the front (one from the torture room). Talk to Dudi to find more clues. The stranger took the artifact, climbed out of the window onto the terrace, and left the tower through the elevator. Go to the terrace from the door on the left side. Tap the table on the left, then the book, and get the Ornate Key.

Tap the location icon in the lower-left corner -> The Stronghold -> choose the very first location where we began our journey. Tap the chest on the right side. Use the ornate key to open this chest. Collect the hammer, the wine, and the nails (from the mini-tool chest inside this big one).

Tap the location icon in the lower-left corner -> select the terrace location where we found the key. Once you are there, tap on the gears on the right side. Tap again, and you will find several teeth are broken. Tap the three gear teeth on the ground and put them in the designated place. Then use the nails and the hammer to repair it. After this, you can use the elevator and head to the tower outskirts. Once the repairing is done, tap the gear to bring the elevator up. Use it again to go down.

Scene: Tower Outskrits
You will get a vial as soon as you enter this scene.

Tap the gargoyle on the ground and take the seal insert.

Once you have the seal insert, head to the right side to the lake.
Scene: Lake
")
Go to the pier on the right and take the bucket of water.

Use the hammer to take the wooden board attached to the pier.

Tap the rocks on the left and look for the snake. Take duckweed from the water next to rocks.

Select the wooden board that we just got from the pier, and then use it to reach the cart in the water.

Once you are on the cart, tap the box in front of the circus poster. Unbox it and solve the puzzle: Melt all the ice cubes by moving them into the fire niches. The grid might be different for you. I have shared the video below solving this ice puzzle that I got:
Once you solve this puzzle, the box will open, and you can take the Old Key from it. Use the old key to open the cart door.

Take the cage, snake catcher, and tap the circus poster on the back of the door. Go back to the previous scene where we got the seal insert. Tap the mouse holes on the left. Use the cage and the water to catch the hamster.

Go to the lakeside. Give the hamster to the snake. Use the snake catcher to catch the snake and extract its venom in the vial. You will get the Snake Venom.

Tap the location icon in the lower-left corner -> Stronghold -> Terrace -> table on the left (it’s the location where we fixed gear teeth). Tap the book and put the following:
- Wine
- Snake Venom
- Duckweed
Squash the duckweed and pour the juice in the sprayer, then add the wine and the venom, then some pollen from the flowers on the right. You will get the sprayer.

From the elevator on the right, go down. Take the left route (use the sprayer to get past the footprints).

Scene: Forest

Tap the tree with vines on the left. Cut it down with the sword. Go past it to the cave.

Scene: Cave

Tap the crystal rock on the left and get the crystal by using the hammer on this rock. Go forward by tapping the center dark area. Collect the footprint. Take the pendant from the web on the right. Select it, use it, and tap again for the pendant key.

Head back to the forest and tap the bag on the right. Use the pendant key to open it. Take the vial of remedy from it.

Go to the cave and tap the chest stuck in the top-right.

Tap the location icon in the lower-left corner -> tower outskirts -> cart/lake area where we caught the snake -> cart -> take the whip. Go back to the cave and use the whip to get the chest we just found above.

Get the metal spider from the chest. After taking the metal spider, go to the top terrace where we fixed the gear teeth. Tap the gargoyle statue on the right near the elevator. Tap its wing. Then tap that odd scale in the center (top) to look under its wing.


This might be different for you. Tap the right pillar to get the clues. I had to press X, triangle, and square twice.

Once you solve this, the right wing will lift, and you can get the Metal Skull.

Tap the metal spider from the bottom toolbar/inventory and place the metal skull + seal insert on it. You will get the spider key. Go to the cave and use this key to open the chest. A puzzle will start. Group the chips around the spider in the correct positions. Click a chip to rotate it. Click the spider to check if the chips are placed correctly. This, again, might be different for you. I have shared the screenshot below for the puzzle I got:

Tap the blue pieces to rotate. Get clues from the arrows. Tap the metal skull to see the result. Try a different combination if you have a different puzzle compared to the above I have shared. Once you solve this puzzle, the chest will open. Check the note and take the crystal underneath the cloth inside the chest. Go back to the forest scene, tap the backpack on the right, and take the silk handkerchief. Go to the cave -> dark area. Put the two crystals on the wands on the sides. There is one in the center with another crystal. Light it all up by using the handkerchief. Start with the left one and use the handkerchief, then the right one, and at last, the center one.

Once you light these three, another wand will show up in the end. Use the silk handkerchief on it.

Tap the cocoon in the center. Use the sword to cut it, and you will find the skeleton. Cut the cocoons on the sides and get two spider legs. Tap the cocoon in the last (center). Cut it down, and you will find a child. Give him the vial of remedy to proceed further.

A spider will appear and remove the web in the center. Enter that area and get another spider leg in the center. Go back to the cave’s entrance point and tap the spider statue on the left. Put all the spider legs to start the puzzle.

Form each spider leg from a single material. Use the indentation on the pedestal to make the space for shifting the fragments. This might be different for you. Here’s the solution picture for the puzzle that I got (the concept is simple; each leg should have the same material color):

Take the manuscript and glowing orb. Go to the spider web scene, then the treasure room where we got the last spider leg. Use the glowing orb to lighten the room. Next, you will have to find and insert all animal tiles into the wall.

I have shared the screenshot below showcasing locations of all 15 animals:

The 14th animal model is locked; tap the knight helmet and get the key to unlock it. You will have to collect the 13th first:
For the 13th animal model, you will have to solve the puzzles. 13th animal (chest underneath the cocoon on the left; use the fork on the left to cut the cocoon): Place the chips into the slots of the same shape. The chains cannot intersect. This might be different for you. I have shared the one I got:

After solving the above puzzle, the spider will appear with a magic stabilizer. Take the magic stabilizer and head to the chamber of the stabilizer.

Adjust the scales and equalize them. I had to scale each one to 27.

That concludes Chapter 1 of Lost Lands 11.
Related:
- Lost Lands 11 Chapter 2 Walkthrough
- Lost Lands 11 Chapter 3 Walkthrough
- Charlie in the Underworld Walkthrough
That’s everything I have in this post about Lost Lands 11 Chapter 1 Walkthrough! If you have any questions, please share in the comments.