Here’s the complete Lost Lands 11 Chapter 3 Walkthrough [The Mountain of Challenges]—With Pictures & Collectibles.
![Lost Lands 11 Chapter 3 Walkthrough [With Pictures & Collectibles]](https://www.mrguider.org/wp-content/uploads/2026/03/Lost-Lands-11-Chapter-3-Walkthrough-With-Pictures-Collectibles.webp "Lost Lands 11 Chapter 3 Walkthrough [With Pictures & Collectibles]")
Lost Lands 11 Chapter 3 Walkthrough
Chapter 3 Title & Intro: The Mountain of Challenges. The Minotaur is searching for a way to board a ship that could take him back to his homeland. But passage comes at a price: he must find the captain’s daughter, who has gone missing in the big city. You can read the Chapter 2 Walkthrough here.
Scene: Ship Dock

Begin with the fountain inspection. Tap the fountain and tap the button on it to open the hidden door. Inside it, you will find a puzzle game. Go back and check the fountain again, take the three pebbles (1/10 black and 2/10 white) from the top and measuring arc from the water.

Go back to the main scene and tap the crates on the right. Then tap the mooring bollard. Take 1 white pebble (3/10) and 1 black pebble (2/10).

On the left side of the scene, tap the second mooring bollard and you will find 1 white pebble (4/10) and 1 black pebble (3/10). At the same time, look inside the boat and get a harpoon.

Next, in the far center, tap the ship entrance area where the barrel is. Get 1 black pebble (4/10) from the top of the barrel.

Use the harpoon to get the rope that is hanging on the ship’s railing. Tap it again and tie it to the harpoon, then throw it towards the wooden plank in front and pull it down to get to the ship. From here, you will receive the harpoon with a rope and head to the ship.

Scene: Ship

Begin by inspecting the barrel on the right. Take 1 white pebble on the barrel(5/10) and 1 black pebble (5/10) on the ship’s railing near the barrel. Also take the helm key on the same barrel.

Next, check the cargo net on the left and take two white pebbles (7/10) from the treadwheel crane.

Tap the wooden helm to look upstairs and then the flag to the front side of the ship. There, you will find 1 white pebble (8/10) and 1 black pebble (6/10).

Go back to the downstairs and tap the door in the front. Take 1 white pebble on the barrel near this door (9/10). Knock on the door with a tap and take the bell clapper that fell down.

Tap the bell that’s on the ship’s center pole. Use the bell clapper to ring it and wake up the ship’s crew and talk to the captain. Take the captain’s scroll and hold key from the captain. Tap the grate in the center and use the hold key to open it and head down.

Scene: Ship’s Compartment

Tap the white pebble (10/10) on the left, top of the lamp. And the black pebble(7/10) on the top of the barrel, which is on the right. On the same right side, next to the barrel, tap the crate and take the following: sailcloth, black pebble (8/10) below sailcloth, and anchor key. On the same crate, you will find a note on its front; tap it and check the instructions. Tap the door on the right(the first one) and read the note on it.

Go back to the deck (tap the round arrow icon in the lower-right corner to head back). Tap the black flag at the top of the ship’s railing and put the sailcloth on. From here, you will go back to the dock and see the sailcloth hanging on the one end of the ship. Tap the sailcloth and uncover it. Use the captain’s scroll to begin the puzzle: rearrange the letters to form the ship’s new name as shown in the note (captain’s scroll). Just move the letters and fish pieces around to match the pattern on the captain’s scroll. This one is pretty simple.

Once you solve this puzzle, you will receive the paper with the order. Head back to the ship and talk to the captain. After the dialogues, you will receive the rose key. Go down to the compartment and tap the door in the center – the one with drawings. Use the three keys you have to open it. Inside this small cabin, you will find a monocular on the blue crate, a golden ticket, and an incomplete sextant inside the blue crate. Go back to the hallway and tap the first door to talk to the goblin. She will discard a serving trolley with a bunch of items out of her room. Take the manuscript from the bottom shelf, the black pebble (9/10), and the cleaver (pour vinegar on the book and collect it) from the top. Below the manuscript, you will find the last black pebble (10/10).

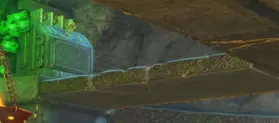
Now check the crate on the right from where we got the sailcloth. Use the knife/cleaver to cut the rope and check inside. But you will find that it’s locked. Go back to the dock and tap the mooring bollard on the right where we got the first pebbles. Use the cleaver to cut some shells (repeat until there are none to cut).

Go back to the ship and tap the lock hanging on the treadwheel crane on the left holding the cargo net. Use the lockpick that Mini gives you to unlock it. Go back to the dock and check the shells near the mooring bollard on the right as shown in the picture above. Use the cleaver to cut some shells; you will get the three pearls from the first shell (might be different for you). Go back to the ship compartment and tap the first room on the right. Select pearls and knock on the door to talk to Goblin, and she will give you the crystal wand.
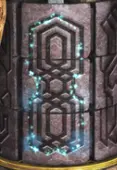
Head to the fountain and start the green color puzzle/mini-game. Put all the pebbles in the slots. Once you put all the black and white pebbles, a puzzle will begin: balance the stones so the top slabs are level and the lower ones sink to the marked line. I have shared the puzzle solution picture below:

Now, you will have access to the top of the fountain. Select the incomplete sextant that we got from the blue crate. Put the monocular, measuring arc, and the crystal wand on it. Once you put all these items together, you will get a working sextant.

Put this on the top of the fountain.

Use the golden ticket to get the items you are looking for and look through the sextant by sliding the horizontal angle and vertical angle. Once you locate the item, tap it to get it.
- Spider constellation: 45 – 235
- Nest: 0 – 190
- Fishing rod: -5 – 240
- Tricorn: 5 – 260
- Horse: -40 – 265
- Sailor: 35 – 315
- Watering can: 10 – 340
- Gear: 30 – 170
- Trident: 20 – 360
- Playing card: -40 – 20 (under the tile. First, go a little left and point towards the rake and tap it to lift the tile with the rake)
- Kite: 35 – 90
- Dream catcher: 0 – 70
- Glove: -20 – 85
- Scissors: -20 – 70 (behind the cart)
- Goldfish: -15 – 160 (it’s inside the crate; open the crate with the chain cutter on the right)
- Queen: -50 – 170 (Chess Piece)

Once you find all the objects, the path to underground through the fountain will unlock. Go downstairs and talk to the blacksmith.
Scene: Underground

Tap the workbench on the left corner and look at the note on it; minting kyolls. Read the note and exit through the gates on the right to the underground district.
Scene: Underground District

Begin by interacting with the man at the left-side table (puppeteer) and the man on the right near the wooden beams where construction is in progress. In the center, tap the hobbling goblin shop and then talk to the man again (the one sitting on the right). He won’t tell you how to go past the bear until you get him some nails. You will receive the nail box. Go back to the blacksmith in the previous scene and ask him for the nails. But the blacksmith won’t give you the nails until you get him the tobacco. You will receive the tobacco box from him. Go back to the foreman and ask him for the tobacco.
Talk to the man on the left (puppeteer), the one who is making the puppets. He will ask for a clear form with an official seal to draft the exchange agreement. You have the paper with the order in your inventory, but it’s dirty and you need something to get rid of the ink. Tap his toolbag on the table – the one with screwdrivers—and ask him for his tools. You will receive a screwdriver.

Tap the location icon in the lower-left corner and select the dock scene. Tap the cargo load on the right. Use the cleaver to cut the rope. Then use the harpoon with the rope to open the cargo box. Get the lemon and clean the paper with the order. Cut the lemon with the cleaver and squeeze the lemon over the document.

Head to the boat and go down to the compartment. Tap the crate on the right and open it with the screwdriver. Inside the crate, you will find a wooden box.

Open the box to begin the puzzle: arrange the planks on the boat without leaving any gaps. The symbols on touching pieces must match.

Get the soda herb from the box. Head to the blacksmith building in the underground and tap the fire pit on the right. Put the sodar herb there and get the soda ash. Select the paper with the order from the inventory and then the soda ash. Select the soda ash and put it on the paper to clean the ink and get the blank form. Give this blank form to Puppeteer in the Underground District. He will prepare the contract for you. Collect the contract and the inkpot with pen on his table.

Go to the man on the right side where construction work is going on and give the contract and pen to him. Once he signs the contract, use the tobacco box to get some tobacco from the bag on the barrel.

Go back to the blacksmith and give him the contract and the pen. Once he signs the contract, give him the tobacco box. Then use the nail box to get some nails. Head back to the old man near the construction site and give him the nails. Ask the old man how to get past the bear and he will tell you about the book that puppeteer has. Head to Puppeteer and ask him for the book. He will need the contract and pen back. Give both items back. And then tap the book on his table (corner). Learn about the tiger bear. Head to the Hobbling Goblin building in the center where Tiger Bear is and take the bucket on the left. Tap the location icon in the lower-left corner and choose the dock location where we began our journey.
Tap the mooring bollard or end side of the boat and then the corner where we collected pearls for the goblin.

Put the bucket in and use the cleaver with oysters.

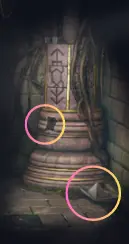
Give this bucket filled with oysters to the tiger bear standing in front of the hobbling goblin building in the undgeroung district. The tiger bear will go on the side and you will have the path open. Check the man on the right that’s falling out of the window and take the gold tooth. Next, tap the door and a puzzle will begin: rotate the circles and align the matching images in each row. Use the arrow sections to move the chips. You can rotate the two circle rings and switch in between the chips where arrows are. Take a look at the center picture; that’s what you have to get on both circle rings (in order) to go past this door. Start with the inner circle ring and then the outer one.

Scene: Tavern

Begin by talking to the bartender and see if she has seen the girl. Give the golden ticket to the bartender. Check the man lying on the floor. You will find a gold kyoll near his arm. Tap the kyoll but it will slip into the floor crack. Go back to the bartender and take one rooster lollipop (caramel candy). Tap the table on the side of the fallen man and put the caramel candy into the tea to make it sticky. From here, you will receive sticky candy. Tap the location icon in the lower-left corner and choose the ship compartment location where we met the goblin. Next to his room, there is a trolley and on the trolley, there is a smelly book, which you need to collect.

Go back to the hobbling goblin tavern and put the smelly book on the fat man sleeping on the floor. He will get up and you can use the sticky candy to get the gold kyoll from the floor crack. You need two more gold kyolls.

Go to the blacksmith location and check the note on the anvil about minting kyolls. Put the gold tooth on the anvil and use the hammer to flatten it. Tap the blacksmith’s apron hanging on the left wooden pillar and check the pockets and grab the blacksmith’s key. Next, check the workbench in the corner and use the key to open the drawer. Open the box inside the drawer and grab the coin die, and check the left drawer for the circular blade.
Tap the machine in the center for shaping metals. Put the circular blade on this machine. Then the flattened gold tooth. Head to the fire pit on the right and tap the air blower in the corner. Go back to the machine where we put the gold tooth and use it to get the gold shavings and coin blank. Go back to the fire pit, put the gold shavings in the pot on the fire pit. Tap the pot to put it in the fire pit and get crucible.
Go to the anvil, put the crucible on the anvil, then use the hammer. Then use the coin die and hammer to get the gold kyoll (2/3) and flattened gold. Go to the machine in the center where we got the gold shavings and put the flattened gold in it. Use the machine to get the gold blank. Go back to the anvil and put the gold blank in the coin die slot. Use the hammer and you will receive the third gold kyoll (3/3).
Once you have three gold kyolls, head to the Hobbling Goblin Tavern and give the three gold kyolls to the bartender lady. Grab the mysterious key from her(counter, near vase). Tap the green drapes in the center of the tavern and then the door behind these drapes. Use the mysterious key to open the door and head inside. You will need three dice to play the game.
Go to the ship at the dock (first scene) and you will find the three dice on the barrel on the right.

Go to the tavern and give the dice to the man and start playing the game. Use the mug to shuffle and roll the dice. Pick three dice and begin the puzzle: place your tokens on the board before the blacksmith. Tokens can only be placed next to others with consecutive numbers. Try to complete the board before the blacksmith to solve this puzzle. Tap the mug, roll the dice, place the tokens on the board following the rule that only neighbor numbers can be placed next to each other (e.g. 4 with 5, 5 with 6).

Open the box and green gas will be released and you will find yourself in the next scene.
Scene: Campsite

Begin by interacting with the curator on the left and registering. Take the rune token and device token from the boxes. Wait for the crow to come and it will drop a note. The curator will ask for your help; you will help her by bringing 15 rune tokens. You will receive the list of runes and a magical mark from here.
Head to the red tent on the left and use the magical mark to enter inside. A puzzle will begin: replicate the pattern by connecting all the dots with beams. Each beam can only be drawn once along a line.


Go inside the tent and put the list of runes note on the side. You need to find 15 runes.

The third one is on the ground behind the boxes. Put the garbage bag on the side. Select the top box and put it on the ground on the side, and do it with all the boxes. The 11th one is inside the chest and you will need three keys to open it. Two keys are in the bottles on the shelves and one key below the cloth one chest side. The 13th one is behind the pumpkin; tap the pumpkins to remove them and check behind. The 15th one is behind the apple basket on the left. It’s locked behind the crate puzzle. Puzzle: Stretch the chain to the other end of the board, collecting all the circles along the way.

Tap the ladder on the right side, open the door, and put all 15 runes into the pile. Next, tap the woman who is raising her hand and get info on the challenge. Once the dialogue has been completed, interact with the elf lady in the blue dress and exchange the rune token for the runestone. Interact with the elf lady on the left in the red dress and exchange the device token for a paintbrush. Once you have the runestone and paintbrush, tap the stone portal in the center and use the runestone to teleport to the first trial. A puzzle will begin: tap the diamond stones to lower them and find all the hidden symbol pairs.

To solve this, you need to pair the same symbols on both sides; top and bottom. Tap the diamond stones to lower them and check the symbol, then tap the other side and hope for the same symbol. Keep trying and you will eventually get all correct.
Go through the opened space to the first room. Here, you have the first riddle: the door will open when both eyes see each other. Take the valve near the door and put it in the right-hand-side slot. Once placed, tap it two times and you will see another valve spot on the opposite side. Take the valve from the opposite side. You will find it rusty. Tap the valve on the right-hand side again and you will have the light in the corner. Check the corner and take the flame block from the right side.

Go back and tap the valve on the right side again to direct the light to the floor’s center. Check it and place the rusty valve in the top-right side of it (the tile with oil on it). This will remove the rust from the rusty valve and you will get the regular valve.

Go back and tap the valve on the right again until the light goes to the opposite side valve slot. Put the valve you have in the inventory on the opposite side slot.
Tap the left-side valve until the light goes to the right corner of the room. Take the paperboat. And then check the right corner. Take the sunblock.
Once you take the sunblock out, select the flame block and put it in the slot where the sunblock was. A puzzle will begin: rotate the sections of the cylinder to form a complete pattern. Once solved, you will see the coal and this will also trigger the “CLICK” event.
Press the right valve and check the right corner and then the locks. Tap the right valve again and move the lights to the floor’s center. Check the center once it’s visible. Put the sunblock in the slot and get the water block. A puzzle will begin: rotate the shapes so that they fill the recess.

Move the right valve again and take the lights to the right corner where you will find the two locks are already unlocked. Use the water block and place it in the left slot on the right corner side. Take the green disc and tap there again to start the puzzle: insert the fragments into the frame and assemble the complete image. Once you solve this, all the locks will unlock and the water will start flooding in the room.

Tap the right valve and take the lights to the center. You will find the morphing object on the left.

Tap the left-side valve and take the left light to the same center – now both lights are pointing to the center. This is the solution to the riddle. The door in the center of the room will be visible. Tap it and then the eye button. Start the puzzle. You have to fill the entire board by placing the required number of chips of each type. Chips can only move until they hit an obstacle. You can watch this video if you are having trouble solving this puzzle.

Go through the door to escape the room to the temple scene.
Scene: Temple

You can see the riddle inscribed on the left wall: “The maiden has her own but desires another’s. The warrior has another’s but desires his own. The sage has nothing and desires nothing.” Take the green disc (2/10) from the right side, behind the maiden statue. Next, the forged bowl in front of the maiden statue. Take the leaky bowl in front of the sage statue in the middle. And a red stone disc and a solid bowl in front of the warrior statue on the left.
Tap the warrior statue on the left and take the spear from his back. Go back to the previous room. Tap the circle on the ground where water is and use the solid bowl and fill it with the water. You now have a bowl of water. Take the green disc (3/10) from the right side in the same room.

In the same room, go to the right corner and put the coal in the forged bowl. Now you have the bowl with coals. Head to the temple and place the bowl with coals in front of the maiden statue. Try the candle on the left to ignite the coals. It won’t work so you need something else. Go back to the previous room and tap the circle point on the ground. Dip the coals in the oil on the right side of the circle. You will get the bowls with coals soaked in the oil. Go back to the temple scene, place the bowl of soaked coals in front of the maiden and try the candle again to ignite the coals. This time you will be successful.
Tap the green wall on the left – the one that has the riddle inscribed. Use the spear on the crack in the wall. The cracked part will fall on the ground, along with some sand. Use the leaky bowl to get the bowl with sand. Place this bowl of sand in front of the sage statue. Next, place the bowl of water in front of the warrior. Once you have placed all the bowls, a puzzle will start: move the bowls and distribute them among the statues according to the hint on their head. Tap the head of the statue to move their gaze and tap the bowl to move them to slots:
- Warrior -> Move the bowl of coals on fire in front of him
- Maiden -> Move the bowl of water in front of her, her gaze should be towards the bowl with coals on fire
- Sage -> His gaze should be towards the sky
- Once you are done with the placements of bowls and gaze, another puzzle will begin

Next Puzzle: Rotate the image fragments and restore the fresco.

Once you solve this one, the stairs will pop up, and you can go to the room on the left. Begin by talking to the competitor.
Scene: Tunnel Room

You will find the manuscript in the chest on the right. Use the lockpick to open the chest. Inside the same chest, you will find the scoop, key, and another green disc (4/10). Now take a look at the large center pillar. Above this pillar, there is an axe – use the spear to get this axe. Tap the chest on the right (again) and this time use the axe to cut down the legs of the tower. The tower will collapse. Tap the top-center of the middle pillar where you see a fallen man. Take the green disc (5/10), the cloth wraps (from the fallen man), and the empty flask that the fallen man has on his back.
The collapsed tower will turn into rubble. Check the rubble and you will get the wooden bars. Use the spear on the wooden boards attached to the tower leg and utilize the axe to make the ladder.

Head to the wounded competitor on the left and put the wooden bars on his broken leg. And use the cloth wraps to secure it. Go back to the previous room and take the water from the bowl in front of the maiden statue to your empty flask. In the same room, tap the fire bowl in front of the warrior and heat the spear. Go to the wounded competitor and give him the water. Use the heated spear to disinfect the wounds. And then use the cloth wraps again on the disinfected arm. Talk to the wounded competitor and once the dialogue finishes, check the green bag and take the auxiliary device and lever. Select the auxiliary device in your inventory and take a look at it. Open all the straps and equip the device in your hand [ you will get a magnetic glove].
Tap the ladder to look at the top. Select the lever from your inventory and put it in the designated place.

Once you place the lever, the bridge will activate and you can look on the top-left side. Head there and use the key to activate the puzzle. You will need sand to get things started.
Go back to the previous room (temple statues) and take the sand from the sand bowl using the scoop.

Go back to the tunnel room and the puzzle on the top left. Put the sand in the hourglass.

A puzzle will begin: empty all the hourglasses simultaneously by flipping them and using the key at the bottom. Here’s the solution:
- Flip all the hourglasses one by one (from left to right)
- Tap the key
- Flip the first hourglass (the very left one)
- Flip the second hourglass (the middle one)
- Tap the key
Once you solve this puzzle, another bridge to the top will appear. Tap that bridge and another puzzle will begin: climb up the brackets, avoiding hidden traps. The solution might be different for you because brackets are placed randomly depending on the run. Here’s the path that worked for me:
- The first bracket in the middle
- Left bracket
- Middle one
- Left
- Left
- Right
- Middle
- Right
- If this does not work, you need to try each run yourself
Once you solve this puzzle, you will fall into the trap in the next scene. Use the magnetic glove and axe to get out of the trap.
Scene: Forest

Take the green disc on the right (6/10). Go to the right-side ruins where you will find the dirty green disc under the wood debris. Use the spear to get it.

Inspect the mechanism on the left and tap those gears. You will find that it’s missing some gear. Go through that hole in the front to the next scene.

Scene: Bridge Point

Tap the waterfall and take the green disc (7/10). While at the same waterfall view, select the dirty green disc and wash it off and you will have the 8th green disc. Now go to the orc lady behind the barrier in the middle of the bridge. Give her the axe for wire cutters. After this, go to the cave on the left side and put the red disc there. Now you have to mix the colors. First, put the yellow one, then the blue one, and then use the stick on the side to mix it up. You will get the green color. Use the paintbrush to turn the red disc into the green disc (9/10).
Return to the earlier scene and aid the girl in her escape by using the cutters. To retrieve the wire that the girl was stuck with, use the cutters once more. Tap the mechanism on the left and put the wire near the cogwheel. Select the wire, then the cogwheel, and then put it on the slot. Start the mechanism to go to the lower side (the underground tunnel room).
Go back to the temple room and look inside the cracked wall. Ask the girl to go in and grab the green disc (10/10).

Go back to the orc lady on the bridge in the mountain summit location. Put the discs in and flip the kyoll. Then play the rock/paper/scissors game. Select your choice in the top-left. Once you win this game, a puzzle will begin = place four chips in a row horizontally, vertically, or diagonally before your opponent does. It’s similar to the tic-tac-toe game. Post this scene, you will fall into an unknown awful environment.
Scene: Trapped Area

Begin by removing the bone pile in the front and getting the snare pole. You will find the tunnel behind this bone of pile. Go through it to reach the cave.

Scene: Cave

Check the goldpile in the corner and take the last manuscript.

Tap the alchemist workstation on the left in the same scene and then the note on the side (you will receive the alchemist’s scroll and stone bowl). Check those glowing green mushrooms on the wall and use the snare pole; you will get phosphorescent mushrooms. Go back to the gold pile in the corner and grab the gold hairpin and silver spoon.
Return to the trapped room with bones and remove the bones from the front-middle to reveal the bag. Take the wooden bowl out of the bag.

Now check the toxic glow on the right. Use the stone bowl to get some centipede eggs. Head to the cave through the tunnel and tap the alchemist workstation on the left. Select the alchemist note/mana recipe from the inventory and then select/put the ingredients: mushroom, silver spoon, hairpin, centipede eggs. You will get reagents once you put all these ingredients on the recipe note.

Put the reagents on the workstation table. Now you have to find the hidden objects and put them in their designated place. You will see the objects silhouettes in the bottom-side inventory.
- Palerite – under the rag on the left-side stone
- Key with symbol – under the rag on the left-side stone
- On the stone, you will see a code. Memorize the symbols and open the chest on the right

- Open the chest to get the following: empty vial and key with symbol
- You will find another key with a symbol on the side of the bottle crate behind the red bushes
- Shuffle the bottles inside the crate and look for the lever
- While looking at the bottle crate, tap the green leaves on the side and you will find a distillation flask
- Another key with symbol is in the furnace firebox at the bottom-center
- Tap the bowl with the lid and you will find Titridium inside it
- Tap the millstone on the right and use the lever
- Put the yellow and blue stones in the furnace firebox
- Spoon in the left bowl
- Put the key with symbols in their designated spots on each bowl
- Select the millstone with lever on the right and put it on the left bowl where we have the spoon
- Put the hairpin on the right bowl and use the lever millstone
- Tap the crate and close it to look behind it. Move the stones behind the crate to get the sickle
- Use the sickle on the centipede eggs and tap the key on this bowl
- Next tap the key on the right bowl and then the key on the left bowl
- Key on the mushroom/green bowl
- Place the distillation flask and empty vial near the mushroom bowl to get mana essence

Go to the statue in the cave’s corner and use the mana essence to reveal the next riddle: When the arrow flies north and the west smells of death, salvation will come from the east. Head back to the bones area and use the magnetic glove to find the kyoll. Check the glove after using it and you will find the kyoll clung to its center piece. Use the kyoll on the magnetic hand to get the magnetized blade. Head to the cave and check the gold pile. Take the jug from the gold pile. Go back to the bones area and fill this jug with water from the waterstream on the left.
Head to the cave and tap the pedestal next to the statue. Pour the water into the pedestal bowl. Then the wooden bowl. And drop the magnetic blade into the wooden bowl. This will help you get the direction.
Tap the wall on the side of the gold pile to progress further.

Check the runes on the wall to begin the puzzle: press the symbols in the correct order. You have already seen the hint. Here’s the solution(in order):
- Upside down A
- M-like symbol
- Upside down Y
- Upside down V

Take the magnetic blade back from the bowl we put on the pedestal top. After solving the rune puzzle, a pedestal with a big button will pop from the surface in the same cave scene. Press it to escape the trapped area and move to the top where the final trial begins.
Scene: Summit (Final Trial)

Begin by inspecting the flag area. You will find one totem figurine near the yellow flag. You will find another totem figurine on the right side of the prize point where you see the chest.

And the third totem figurine is in between the rocks where water is coming from.

The fourth totem figurine is on the ground near the dolmen on the right.

Tap the stone structure on the left and put all the totems in their designated slots to reveal the puzzle.

Totem Puzzle: Place the animal figures in the recesses of the same shape. This puzzle might be different for you (animal figures and holes are random depending on the game version). You can watch the following video (this is what I got in my play):
Once you solve this puzzle, you will get a goblet. Fill it with the water from waterstream on the left. [Tap the stones on the left to view the stream and then use the goblet to get a goblet of water]. Go back to the animal figure puzzle point and pour the water into the middle tree.

Take the key from the tree figure that pops up on watering that tree. Talk to Kiara (dialogue). Put the key on the prize totem. A puzzle will begin – rotate the center stone and restore the image.

That’s it for now in this Lost Lands 11 Chapter 3 Walkthrough. This was the final puzzle. After this, follow the dialogues and story to get to the end.
Related: